
This document provides information on how to install emacs.
Disclaimer: The two sections A simple "reproducible research" emacs configuration and A stub of replicable article explain how to set up emacs/org-mode for this MOOC. These are very important sections in the context of this MOOC. These sections are illustrated in two out of the three video tutorials of this page, and which you really should follow carefully. Otherwise, you may have trouble doing the exercises later on. Likewise, I strongly encourage you to watch the "Use Emacs/git" video tutorial available at the same page.
There are many different ways to install Emacs and the languages R and Python on your computer. The one we recommend, and describe in the following, uses the package manager conda. It has the advantage of working more or less identically under Linux, Windows, and macOS. Another advantage is that the conda ecosystem contains a wide range of scientific software, which you might want to use for your own projects. If you are an experienced systems administrator, you are of course free to choose another approach to installing software, it's only the result that matters.
First, download the most recent version of Miniconda. Miniconda is a lightweight edition of Anaconda, a software distribution that includes Python, R, and many popular libraries for scientific computing and data science.
Install Miniconda following the supplied instructions. Whenever (it it not systematic) the installer asks you the question
Do you wish the installer to initialize Miniconda3 by running conda init? [yes|no]
answer yes. You will then see the advice
=> For changes to take effect, close and re-open your current shell. <=
which you must respect to make sure that the following steps work correctly.
Important: You should then run all the following commands through the conda shell. As explained in the Anaconda documentation, to open the Anaconda prompt:
The first command to run next is
conda update -n base -c defaults conda
which updates all the software in the conda distribution.
We can now create a conda environment for the RStudio path of out MOOC:
conda create -n mooc-rr-emacs
and activate it:
conda activate mooc-rr-emacs
It is not strictly necessary to activate an environment in order to use it, but doing so makes the use of the environment easier and less error prone. You have to perform this activation step every time you open a new terminal, before you can work with the environment.
The next step is the installation of all software packages we need and which are in the Miniconda distribution:
conda install python numpy matplotlib r r-ggplot2 r-dplyr r-hmisc
We also need one package that is not in Miniconda, so we request it from the independent package source conda-forge:
conda install -c conda-forge emacs r-parsedate
You can now start Emacs directly from the command line:
emacs
Under Windows and macOS, you might be tempted to start RStudio from the graphical user interface. It is in fact not so difficult to find Emacs.app in the conda environment and open it directly. But you have to resist that temptation. If you don't run RStudio from the command line, it won't be able to detect the conda environment that you activated.
If you want to convert your notebooks to PDF files, you must als install LaTeX on your computer. We explain this step in a separate resource.
This section is illustrated in a video tutorial ("Mise en place Emacs/Orgmode" in French). Watching it before following the instructions given in this section may help.
Emacs comes with a very basic default configuration, so almost everyone wants to personalize it. Given the flexibility of Emacs, a configuration can become quite complex and in fact include what would otherwise be considered complete software packages (see for example these Emacs Starter Kits here or here). In the context of this MOOC, we propose a relatively minimalist configuration oriented towards "reproducible research" with Org-Mode. If you are new to Emacs, we strongly recommended that you use it with as little modification as possible, by following the instructions in this section. If you are a more experienced Emacs user, you can go through the instructions and adopt the pieces that you consider useful for you.
It is unfortunately rather probable that some of you will run into unforeseen problems with this configuration. If that is your case, ask a question on the forum. We will do our best to help you.
If you have used Emacs before, you may already have a personal configuration. And even if not, you may have Emacs configuration files without being aware of them, since some software packages create or modify Emacs configuration files. In order to avoid trouble, remove prior configurations, after making a backup elsewhere.
The files that you should backup and then remove (if they exist) are:
~/.emacs~/.emacs.el~/.emacs.elcThere is also a directory that you should backup and then remove (if it exists), with everything it might contain:
~/.emacs.dIn the above filenames, ~/ stands for your home directory. Windows users should replace it by C:\Users\MyName, replacing MyName by their user name.
Download this archive and uncompress it. It contains the following files and we will refer to them in the following:
rr_org/init.el
rr_org/journal.org
rr_org/init.org
Alternatively, the files you are looking for are available here. As you may notice, the configuration (init.el in emacs lisp) is hard to follow, which is why we manage it through an init.org file, which is really nice for readability. This is a trick you may want to adopt too (i.e., modify the init.org and regenerate the init.el by simply tangling the file –with M-x org-babel-tangle, see instructions in the beginning of init.org).
If you use Windows, and if you use a desktop shortcut to start Emacs, you must include the path to the file init.el in the command for the shortcut. For example, if you installed Emacs as C:\Users\MyName\emacs, your desktop shortcut should execute the command C:\Users\MyName\emacs\bin\runemacs.exe -l .emacs.d/init.el.
Create an org/ directory in the top of your home:
Then copy rr_org/journal.org file in your ~/org/ directory. This file will be your laboratory notebook and all the notes you will capture with C-c c will go automatically go in this file. The first entry of this notebook is populated with many Emacs shortcuts that you should give a try.
Create the directory ~/.emacs.d/ and copy rr_org/init.el into it.
There are two situations in which it might be necessary to modify init.el:
For diagnosing your installation, do the following:
conda (as we recommend), activate the environment that you have created for this MOOC. Then try to run the following commands:
python3 and R under Linux and macOSPython and R under Windowsinit.el is the complete path to each executable.If you do have to modify init.el, check the comments at the beginning of the file for instructions.
Quit Emacs if it is running, and start it again. This first start will take a bit of time because Emacs will download a few add-on packages. For that reason, please make sure that you have a working internet connection for this step. Note also that the download can fail for other reasons, such as the package servers being overloaded. Such situations do not last very long, so we recommend that you just quit Emacs (C-x C-c, meaning Ctrl + x followed by Ctrl + c) and restart it. At worst, repeat this until you get no more errors on startup.
Next, create a file foo.org. Copy the following lines into this file:
#+begin_src shell :session foo :results output :exports both
ls -la # or dir under windows
#+end_src
Put your cursor inside this code block and execute it with the following command: C-c C-c (If you are not familiar with Emacs commands, this one means 'Ctrl + c' twice)
A #+RESULTS: block with the result of the command should appear if it worked.
In the video, we already have demonstrated the main features and shortcuts of emacs/org-mode that will help you maintain a document and benefit from literate programming. The list of features and shortcuts is demonstrated in the first entry of your labbook.
In step 2, you were told to create a journal in ~org/journal.org. You probably want to make sure this file is stored in a version control system like git. We leave it up to you to set this up but if you have any trouble, feel free to ask on the MOOC forum.
This section is illustrated in a video tutorial ("Write a replicable article with Emacs/Org-mode"). Watching it before following the instructions given in this section may help.
To work with this article stub, you need working installations of LaTeX, R, and Python. If you can't open a terminal and run the commands R, pdflatex, and python3, you will not be able to generate this document. When being compiled, the article downloads the corresponding LaTeX packages, so you must have a working network connection.
Note for macOS users: Since the article is compiled using make, you need to put the Emacs executable on your shell's search path, as explained above under advanced topics.
Download the following archive and uncompress it. The archive contains the compiled article, so you can start by looking at it.
To rebuild the article, delete article.pdf, or rename it to something else. Otherwise the rebuild procedure will simply tell you that the article is already up to date. Then type make to build everything from scratch. Open the freshly built article.pdf to see if it looks OK.
If you get tired of always re-executing all the source code when exporting, look for the following line in article.org:
# #+PROPERTY: header-args :eval never-export
If you remove the # in the beginning of the line, it will not be a comment anymore and will indicate org-mode to stop evaluating every chunk of code when exporting.
Learning Emacs and Org-Mode can be difficult as there is an inordinate amount of shortcuts. Many people have thus come up with cheat-sheats. Here is a selection in case it helps:
Common and step-by-step Emacs shortcuts for our reproducible research configuration
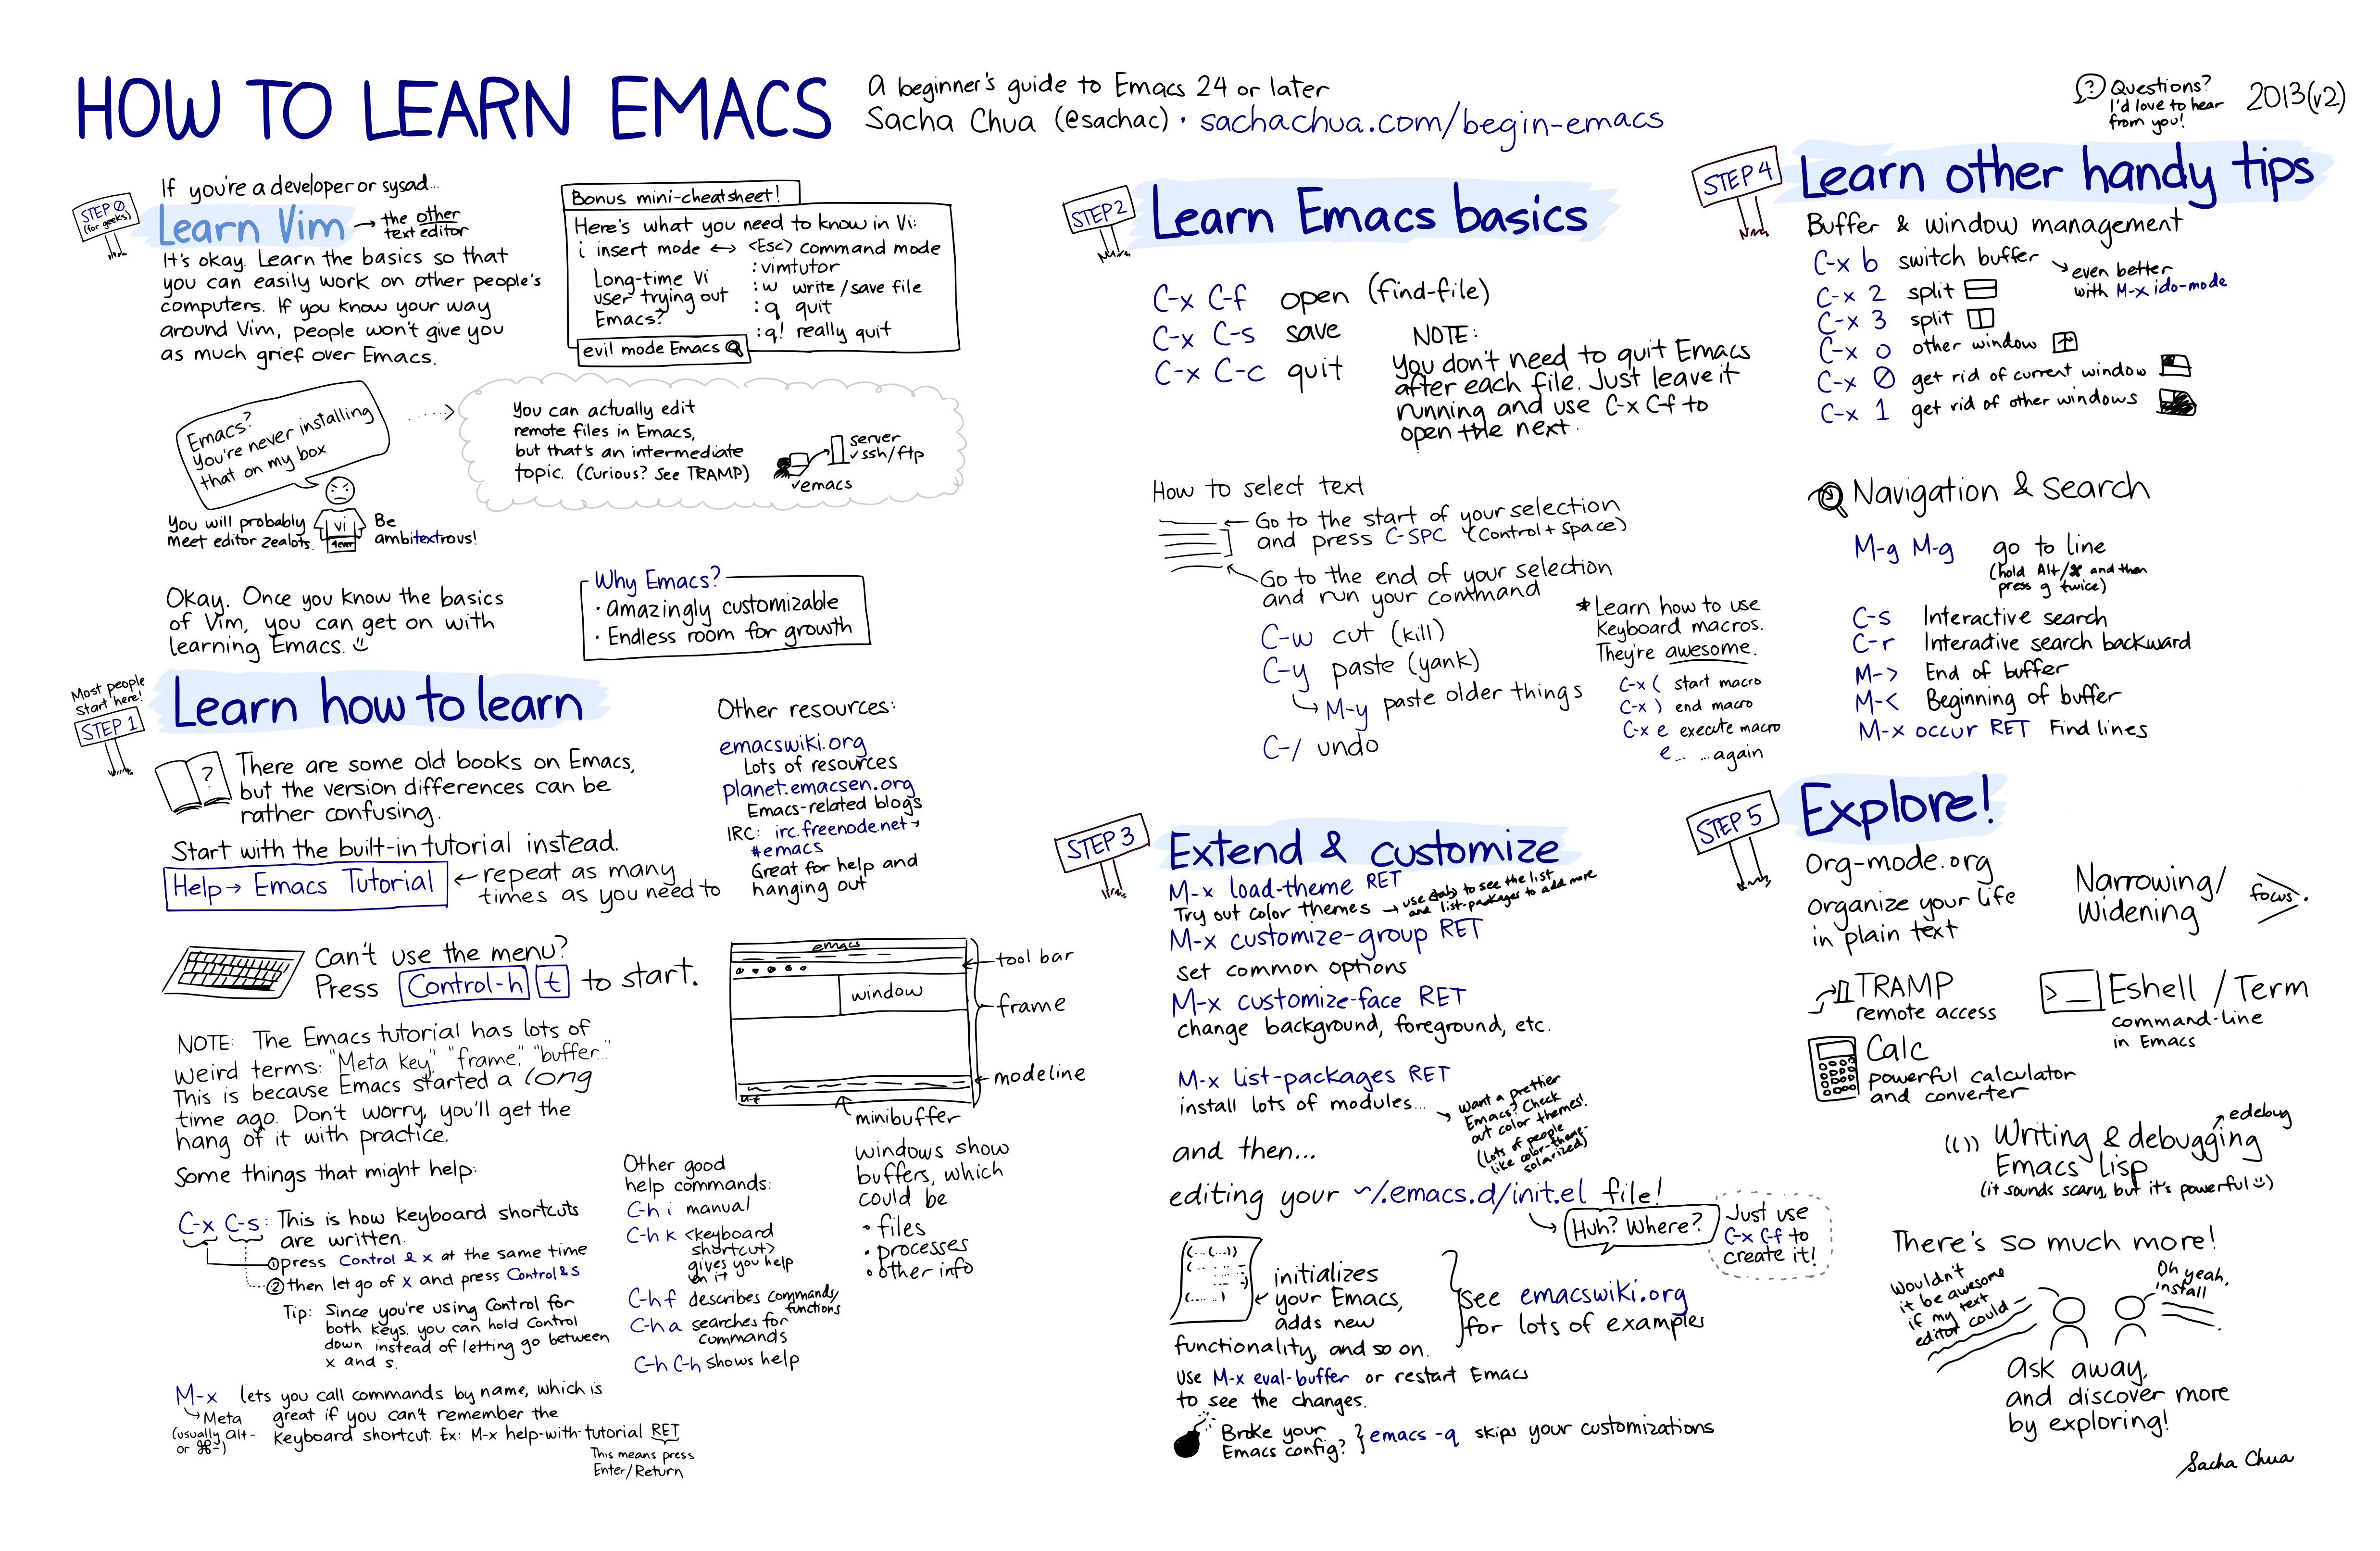
Two graphical cheat-sheats by Sacha Chua on how to learn Emacs and on how to learn Emacs shortcuts.
For those of you who prefer video explanations, here is a Youtube channel with many step by step emacs tutorials.
For general information about a number of packages you could also check the Using Emacs, series of blogposts / videos.
Company-mode is a text completion framework for Emacs. It allows to have smart completion in emacs for the most common languages. If you feel this is needed, you should follow the instructions from the official Web page: http://company-mode.github.io/
Magit is an Emacs interface for Git. Its usage is briefly illustrated in the context of this MOOC in a video tutorial ("Utilisation Emacs/git" in French).
It is very powerful and we use it on a daily basis but you should definitely understand what git does behind the scenes beforehand. If you feel this would be useful for you, you should follow this visual walk-through or this really short "crash course".
If you installed the previous "reproducible research" emacs configuration, you can easily invoke magit by using C-x g. Magit will then prompt you for the path of your local clone of the git repository (the path to mooc-rr in the context of this MOOC). 
If you do not rely on our "reproducible research" emacs configuration, you should have a look at how to install magit from the MELPA archive.
The following method has been tested with Windows and worked like a charm:
Add the following piece of text in your .emacs.d/init.el file:
Launch Emacs and run the following commands:
M-x package-refresh-contents RET
M-x package-install RET magit RET
NB: M- corresponds to the <Alt> key and RET corresponds to the <Return> key.